A playbook for Agile Retrospective meetings detailing the different approaches a team can take to improvement
12 Aug 2024
The Scott Logic practitioner's guides are designed to be small practical guides for IT professionals. We draw on our collective experience to tackle topics that we don't feel are addressed elsewhere. Our hope is that these little 'value adds' will help you just as much as they have helped us.
This guide is made available under the permissive Creative Commons CC BY-NC-SA 4.0 license
Introduction
Retrospectives (sometimes referred to as "retros") are considered by some to be the most powerful meeting in Agile methodologies. They are the mechanism by which we learn from past iterations and improve future iterations. Most people are familiar with some variation of the format:
- What went well last sprint?
- What problems did we encounter last sprint?
- What actions can we take to improve our next sprint?
This is a fine format and has become a standard for a good reason - it cuts to the core of what iterative development is about - using past data to empirically improve future performance.
However, there are times when this format does not serve us as well. Some examples are:
- The team is new, and they do not know each other well - team members are shy about participating.
- Retrospectives have become predictable and the team is losing engagement.
- We want to examine a greater time period, such as a project or a quarter.
- We want to focus on a specific, long term, objective.
- We want to focus on a specific, large issue.
In these cases, and others, there are different retrospective formats that may help your team achieve the outcomes they desire.
This guide contains a collection of alternative retrospective formats with details of how to run them and why you want to.
Many of these formats will have been seen before but are presented in a way that you can dip in and out of them and use this as a reference guide. Whether you are a seasoned retrospective facilitator or running a retro with your team for the first time there should be something for you here.
Principles of a Retro
Retrospectives are a time for the team to come together and raise how they currently feel about the work and team and help identify improvements and changes we want to make to the process. They should be for the team to shape and have the opportunity to control. The following principles should be considered when setting up retrospectives with your teams.
- Regular & Scheduled: Don’t get to the end of an iteration and go “well we should probably have a retro now” or be frantically trying to find a time in the calendar to discuss how we work. Get a regular slot in everyone’s calendars that everyone in the team can make.
- Time-boxed: Retros that run on for hour after hour can be a drag on everyone’s time and attention. Since we have the whole team in attendance we should be intentional with that time and use it appropriately. If a discussion about an issue is going on too long, consider setting up a specific follow-up session just to discuss that with the interested parties and move on to what affects the whole team.
- Looking inward on the Team, with only the team involved: Identify who the team is (the people who are actively working together every day) and who should therefore be in retrospective. You should not have external observers or occasional stakeholders in the retro as they are not beholden to the actions of the retro.
- Structured and facilitated: You don’t want to go into a retro and suddenly discover no one knows what you are going to do for a session. Plan out in advance who is facilitating and what activities they’ll run. In the early weeks of a team this should be someone experienced (e.g. the scrum master or team lead). As time goes on it’s great to share this around the team and get more people involved. Also ensure that one member of the team, possibly the scrum master, is acting as a dedicated facilitator. It is their responsibility to ensure that the meeting stays on track and follows the structure. They should also ensure that all participants have a voice.
- A safe space: It is incredibly important that every participant in the retro feels as if they can raise issues to the wider team. This is perhaps best expressed in the Retrospective Prime Directive:
“Regardless of what we discover, we must understand and truly believe that everyone did the best job he or she could, given what was known at the time, his or her skills and abilities, the resources available, and the situation at hand.” - Norm Kerth
Top Tip
Running Remote Retros
All the guidance is intended to be generic enough to apply to teams running retros in any setting. Typically, the advice has been written with software delivery in mind (as that’s our speciality) but could also be applied wider than that.
The formats expressed below are designed to be run in person or remote without needing to change them. Minimum requirements for an online tool:
- Everyone can see and interact with the board
- The facilitator can define their own format for the retro
- We can create notes, move them around and mark them with votes
Structure of a Retrospective
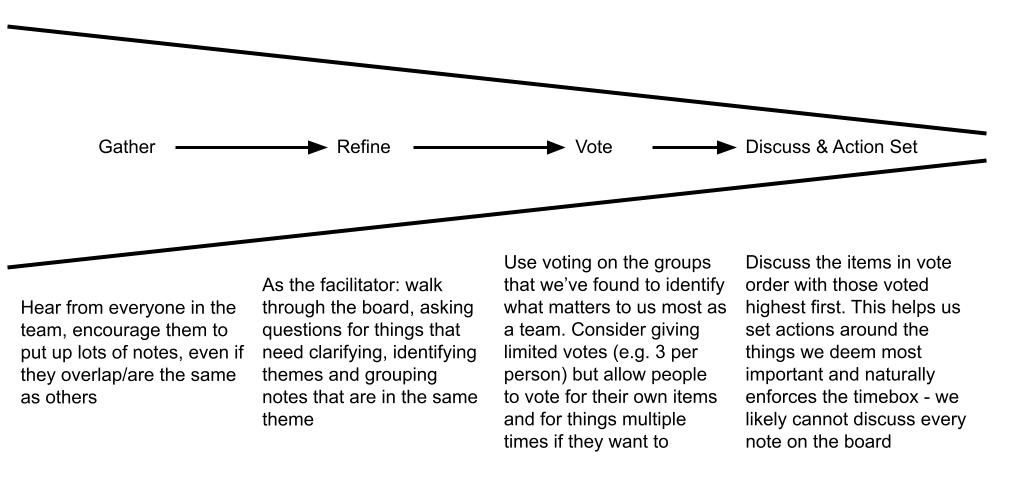
So, you’ve got a time, a place (online or physical), you know who’s coming to the retro and who is facilitating. Now, you need to plan out how the actual meeting will run. A common format for running retrospective meetings is:
- Icebreaker - An opening activity designed to get people talking and thinking about their feelings on the current work. Often a 5-10 minute activity up front.
- Main Activity - The actual format we are using. We will spend the majority of the time gathering notes from everybody in the retro according to our current format and discussing these items to identify themes and commonality.
- Action Setting - Reserve the last 10-15 minutes of the retro for setting actions and ensuring that everyone knows the next steps. See more about setting good actions below.
Retrospective Types
To help distinguish between different styles of retrospective, we’ve split up the formats into loose categories: Optimising Process, Looking Back, Looking Forward and Focus Retros.
Optimising Process Retros: These retrospectives are the standard style of retro, typically aiming to:
- Look back at last sprint/iteration
- Identify things that are good
- Identify areas where we can improve
- Decide where to focus energy on improving how we work
Optimising process retros are your bread and butter of retros. Most of the retros your team will want to run will be like this and the formats serve to help you make focused change over time.
Looking Back Retros: Whilst in most retrospectives we are focusing on the most recent iteration/sprint it is also very important for us to reflect back over a longer period of time - particularly when we consider just how far a team might have come in 6 months or a year of working on a project. This family of retrospectives is getting the team to “cast their minds back” to the past of the project, reminding us of older challenges, key events and achievements that have happened to this team.
A “Looking Back” retro can also be used as part of a wider review session, for example at the end of a year or setting the scene for how we can plan for the next longer period of work.
Looking Forward Retros: These retrospectives are for looking ahead at longer term goals and aspirations, typically:
- Looking forward to goals/objectives/vision/direction
- Identify things that will help us on this journey
- Identify things that will slow us down/hinder us
Focus Retros: These focus on specific activities to run when you want to focus on an aspect of the team. Examples include:
- What are our biggest challenges? You may choose "Circles and Soup"
- What is our vision for the future of the team? You may choose the "Resolutions Retro"
- How do we feel about the meetings we attend? The "ESVP" retrospective may be applicable.
Top Tip
Walking the Board
In lots of these retro formats we suggest “Walking the Board”. This is a process where you as the facilitator will read aloud every single item that has been raised for the whole team to acknowledge. During this time you are trying to clarify things in case they aren’t clear to everyone and answering questions the team asks about them. You should add detail to notes if it helps clarify.
However, you should be careful that you don’t start discussing the notes at this step. We only want to know “do we all understand what this means?” not “do we agree with this?”. The temptation is to keep the conversation going but at this step we just want to cover everything raised fairly and equally. Our aim should be to set up a platform where the team can then vote on what they want to discuss.
Optimising Process Retrospectives
This part of the guide provides templates to run retrospectives aimed at optimising a team's process.
Keep, Stop, Start
The Keep, Stop, Start (or "Stop, Start, Continue", or any variant) is the classic retrospective format that most of will have used.
Why should I use it?
The old faithful. Identify what is working well for the team, what isn’t working and what new ideas people have to bring.
- Good For: a simple, repeatable format to uncover small improvements for ways of working.
- Not so Good For: variety; Keep, Stop, Start is rather plain and can get dull running from sprint-to-sprint. There isn’t much focus on achievement or direction either.
Setup
The facilitator will:
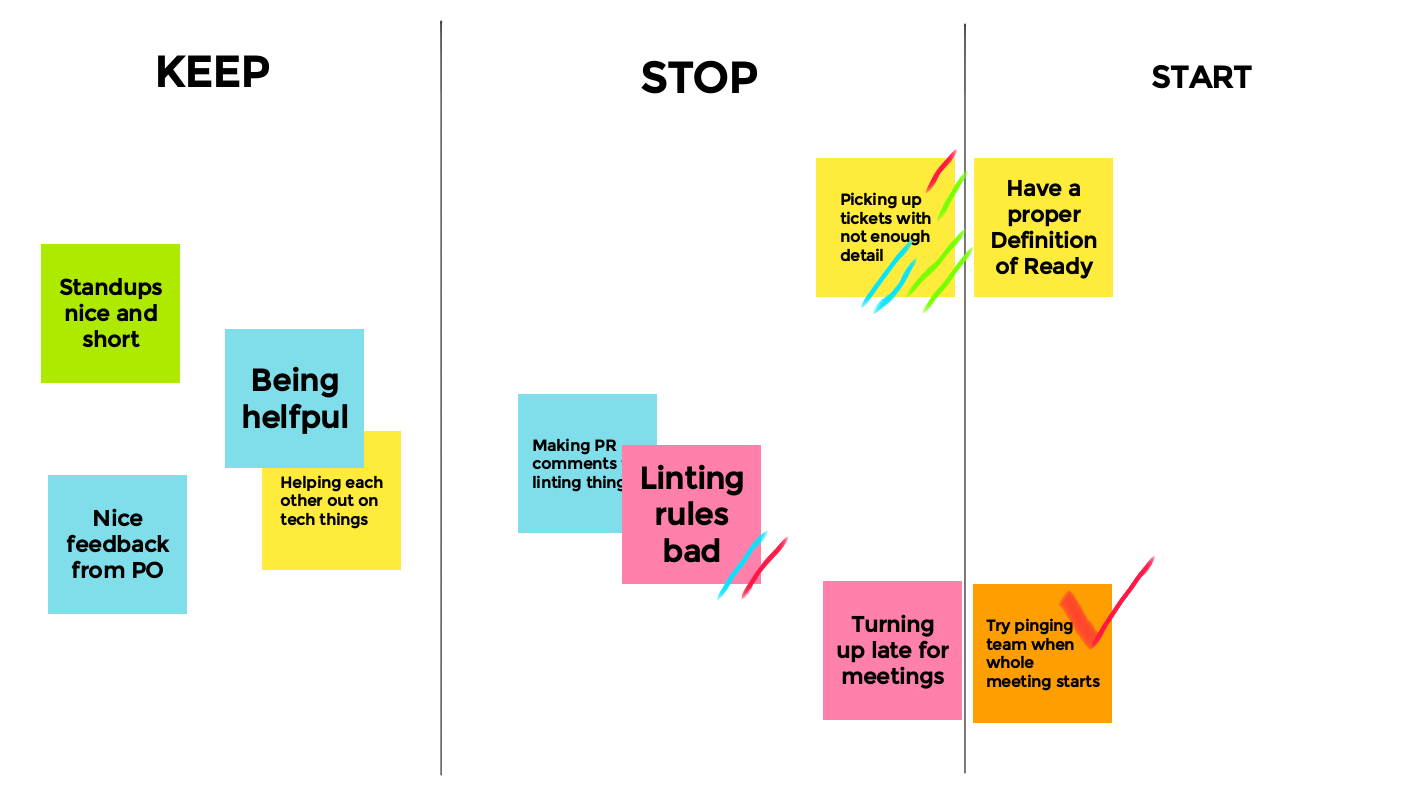
- Draw 3 columns on the board.
- Label the columns “Keep”, “Stop” and “Start”.
Components
- KEEP is for the things that went well in the iteration, good moments, practices that worked well and things we tried last sprint that were good.
- STOP is for the negatives; things we’d like to stop doing, don’t want to happen again next iteration and weren’t good for the team. This is the section you’ll likely want to focus on in action-setting.
- START is for new ideas! New suggestions of ways we can improve how we work and try new things.
Running the Retro
- Everyone adds notes to all columns. Time-box this to around 10-15 minutes in an hour retro or shorter for less time. Optionally, open the digital board early or getting the team to bring pre-written sticky notes to save time during the retro.
- “Walk the Board”, starting with "Keep", then "Stop", then "Start". Read the notes in each column in order, clarifying anything that the team doesn’t understand. Don't discuss any notes in depth and try to gather related notes together and identify themes.
- Give all the participants a number of votes, usually between 3 & 5, and get everyone to vote on whichever notes they most want us to action. Allow participants to vote on their own items, use multiple votes on the same item and see how others are voting.
- Start discussion on the group of notes with the most votes, potentially with who raised it. As the facilitator, try to hear sentiment from across the room and gently direct to team to focus on what action we can take related to this note for the next sprint.
- Continue with the next most voted notes until time runs out or the team reaches a set of actions they are happy with (no more than 5).
What should I get out of it?
At the end of the "Keep, Stop, Start" retro you should have a set of actions ready to take into the next iteration. Not everything will have been fully discussed or resolved but the team should have some focus on what you will be able to change in next sprint.
Star-Shaped Retro
A direct extension to the "Keep, Stop, Start" format, the "Star-Shaped Retro" adds “More” and “Less” to our categories, allowing us to be a little more nuanced in the notes that the team raises.
Why should I use it?
If the team is getting too many notes for Keep, Stop, Start or if the team is particularly large; the star-shaped retro can help to illicit more feedback from the team. Conversely, if you are struggling to agree what we can “Stop” and “Start” perhaps you can start with “what should we do a little more of/do a little less of”.
- Good For: nuance and eliciting smaller issues from the team.
- Not so Good For: focusing on specific topics, expect a broader array of issues raised.
Setup
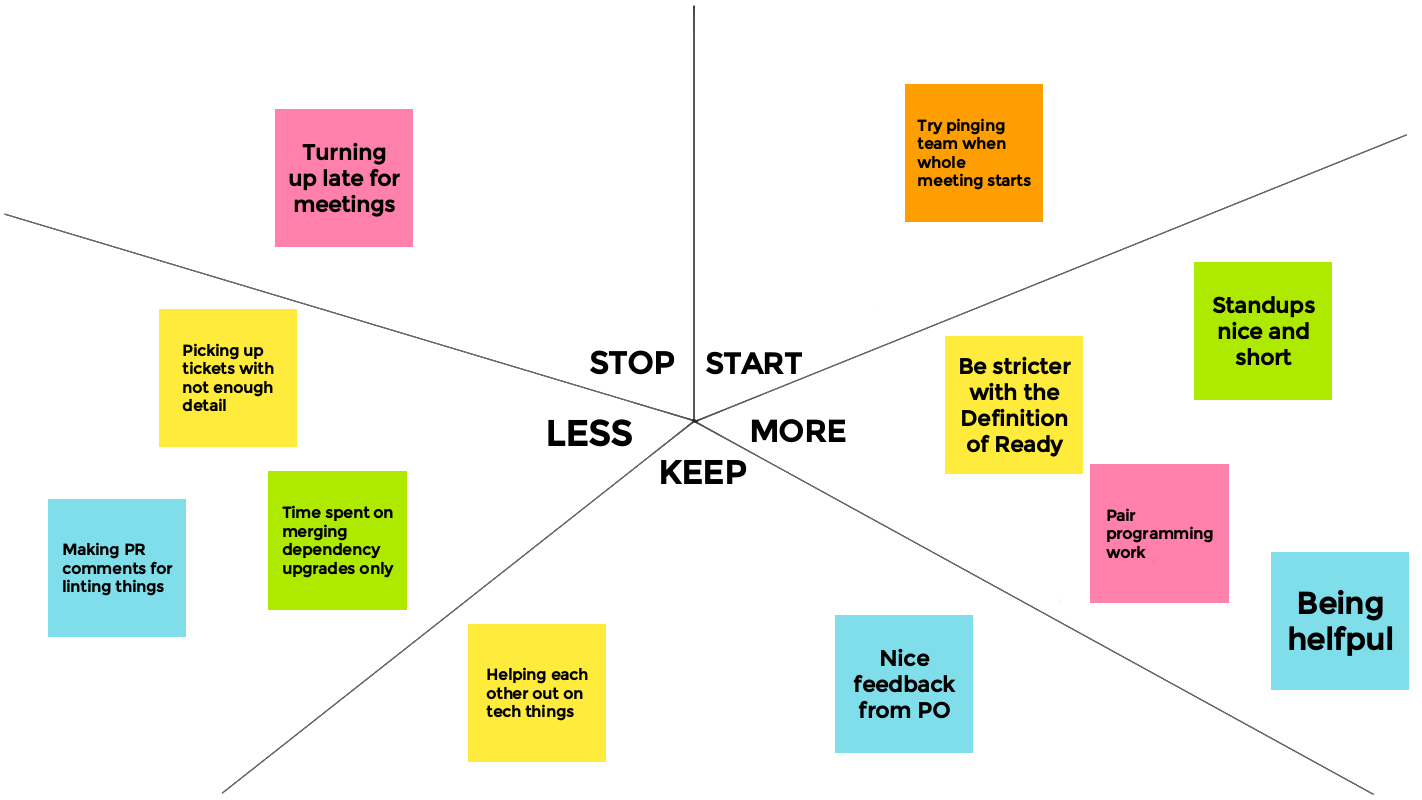
- Split the board into 5 roughly equal segments.
- Label the sections clockwise: Start, More, Keep, Less, Stop.
Components
- START is for new ideas! New suggestions of ways we can improve how we work and try new things
- MORE is for practices that we’ve started that we want to do more of - or something particularly successful from last iteration that we should try expanding.
- KEEP is for the things that went well in the iteration, good moments and practices that worked well.
- LESS is for annoyances and slowdowns. These might be necessary tasks/practices that we can’t necessarily stop but doing less of them would be good.
- STOP is for the negatives. Things we’d like to stop doing, don’t want to happen again next iteration and weren’t good for the team.
Running the Retro
- Encourage the team to add notes to all sections. Consider challenging everyone to have at least 3 notes on the board in different columns.
- “Walk the board”, starting with START and going clockwise.
- Identify themes across notes and move them around the star to group them up - you can add a prefix of where it came from or reword the note to keep it making sense.
- Vote and work through the groups in vote order. Consider focusing on the “MORE” items as simple actions that we can commit to, since we likely will have already started this action.
What should I get out of it?
At the end of our star-shaped retro we should have a broad array of feedback and some simple things to do more of or start doing and actions to improve the things we want to do less of or stop.
4 L’s Retro
A structure for running a retrospective focusing on how we felt about the last sprint and identifying things we learnt.
Why should I use it?
You want to highlight the positives of our work and recognise that learning lessons is a valuable use of our time.
- Good for: highlighting positives, hearing about how people feel about the work.
- Not so good for: teams that don’t feel as if they are learning anything new.
Setup
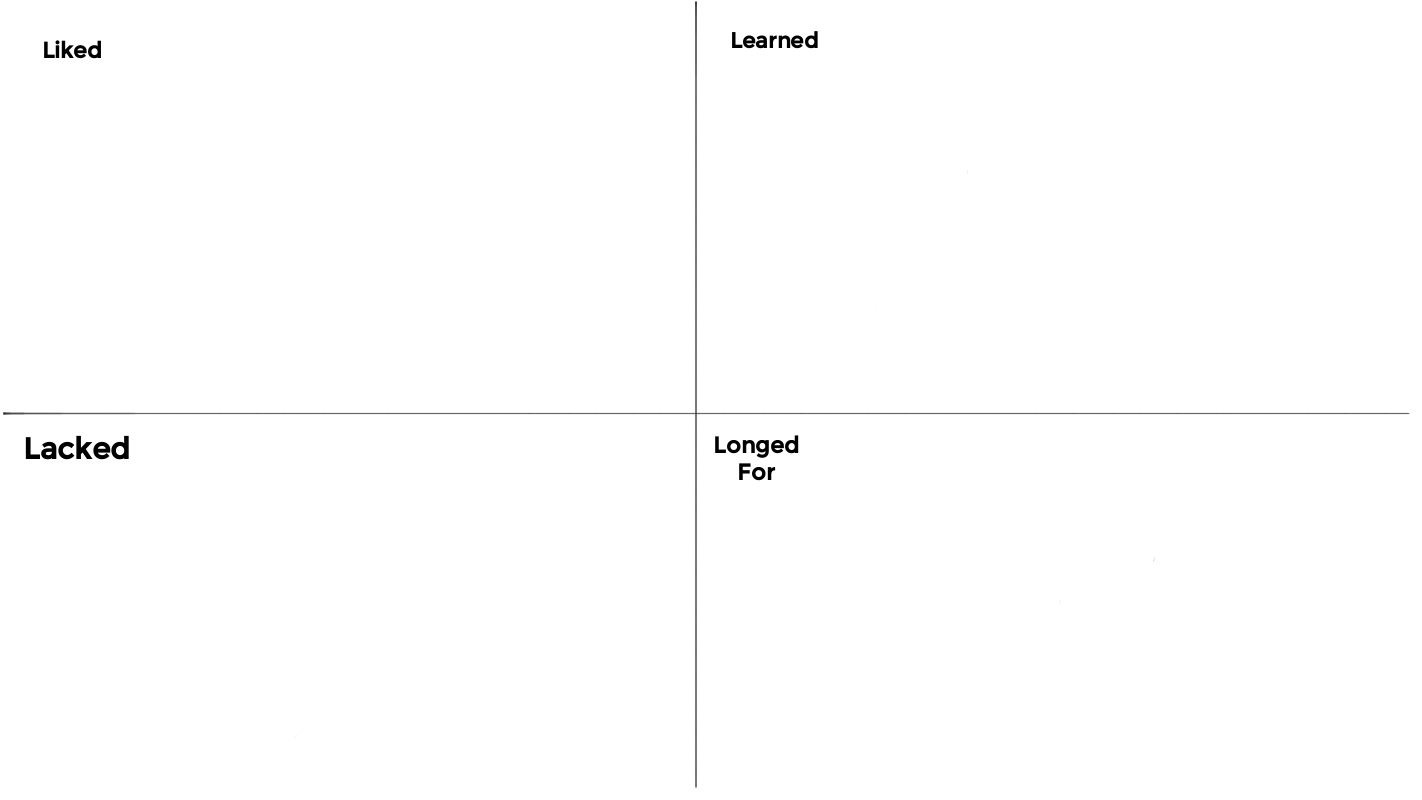
- Split the board into 4 equal segments.
- Label the segments left-to-right, top-to-bottom “Liked, Learned, Lacked, Longed For”.
Components
- LIKED is for the team to raise what they liked about the last iteration. Encourage them to focus on positive pieces of work, assistance from other team members and achievements.
- LEARNED is for all the interesting and unexpected things we learnt last iteration. Try to get everyone in the team to answer this - you should be able to find something new you learned. This can be good to highlight quirks we discovered in our work, new skills or potential future training opportunities for the wider team.
- LACKED is for those things that didn’t go so well; the things that we feel are lacking from our working practices or are slowing us down.
- LONGED FOR is all about new suggestions that will make our lives easier. We want to find the things that if we'd had before, we could’ve completed work quicker/easier/more smoothly.
Running the Retro
- Give the team some time to add notes to all sections, encouraging everyone to add at least one note to the "Learned" section.
- Start with the "Learned" section and run through everything in here. Consider if this learning can be extended out to the wider team.
- “Walk the board” through the rest of the sections, starting with "Liked" and focusing on achievement and positives. Clarify and group the notes within "Lacked" and "Longed For".
- Using the "Lacked" and "Longed For" sections, identify areas we can set actions on. Discuss these one at a time using voting to highlight what the team most wants to improve.
What should I get out of it?
The team should reflect on the positives of the sprint; "Liked" and "Learned" gives us more space to discuss the good. At the end we should have actions around the things we lacked and longed for.
Looking Back Retros
Here we look at the "Looking Back" retrospectives, designed to consider a longer period of time than just the last sprint.
Timeline
As a group we’ll remember the key events that occurred over a period of time and how we’ve changed since then.
Why should I use it?
Timeline retros are great when the team has been working together for a longer time, and you want to review that period.
- Good for: reminding the team how far they’ve come, what challenges they’ve overcome and the magnitude of work that has been done.
- Not so Good for: newer teams, setting new goals for the future or improving the current work.
Setup
- Draw a horizontal line all the way across the middle of the board.
- Label the far left with a starting event. This could be a release, or the resolution of a challenge, for example.
- Label the far right of the line with an ending event - most likely this meeting!
- Label some useful equidistant times across the board. For example, if your timeline is for 6 months you should add small markers for the start of each month, or if your timeline is a few sprints, mark the boundaries between them. This will help us to position the events we raise in the right place.
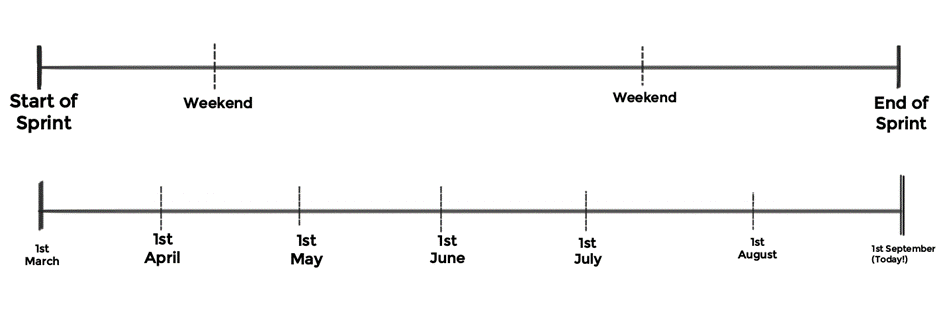
Components
- The starting event is the point in time you want us to think back to, this could be the start of a piece of work, a quarter or the last time we did a larger review.
- The ending event is probably now, but may be another date, such as the end of the project or the date the product was deployed to the live environment.
Running the Retro
- Present the timeline to the team, explaining and agreeing the time period you are discussing.
- Ask the team to add events, achievements, significant milestones to the board. Include things like “Product Phoenix delivered to production”.
- Trace back the end dates of work to include start points e.g. “Project Phoenix first requirements session”. This can help to plot how much of the timeline we were working on individual items.
- Allow the team to plot significant challenges or slowdown moments too. Consider individuals spending an amount of time on work or supporting an issue.
- Encourage discussion as events pop up, expect those “oh yes, I forgot we did that” moments. At the beginning it will seem hard to fill a blank timeline with everything that happened over a long period of time, but it will get easier as the team generates reference points. This doesn’t have to be accurate, as long as events are roughly in the right order that’s good enough.
- Once the full timeline is up on the board, run through it from left to right, highlighting through-lines and connections to later events. Acknowledge the portion of time we spent on bigger activities and how long it takes to complete full pieces of work. Try to find the biggest challenges and ask “if we were doing this piece of work again, what would we do differently? Could we have predicted this challenge, mitigated it, or identified it earlier?”.
What should I get out of it?
At the end of the session you should have an overall picture of what the last portion of time looked like for the team. This can lead into setting ambitions/directions on how we would tackle these challenges in the future, but it isn’t the main purpose of this activity. Teams often use the timeline as a starting point in a wider review, with other activities focussed on the now and the future.
Journey
Similar to timeline, Journey is about plotting a particular project/iteration/length of time in a visual way. The main difference is we are focussing more on a specific project/goal instead of a period of time.
Why should I use it?
Journey is useful for getting an overall picture of how the team worked on a specific activity. A team will consider milestones, challenges and how close we have made it to the goal.
- Good for: getting the whole team to understand the journey that our work took, reminding us about the twists and turns and challenges overcome.
- Not so Good for: shorter goals or projects that haven’t been running long enough.
Setup
- Draw on the board a simple representation of a journey that starts on the left of the board and ends on the right e.g. a winding road, a mountain to climb or an adventure map.
- Label the start of the journey with the project kickoff.
- Label the end of the journey as the overall goal of the project. Note that sometimes you don’t have to be right at the end of the journey of this work for this task to be useful.
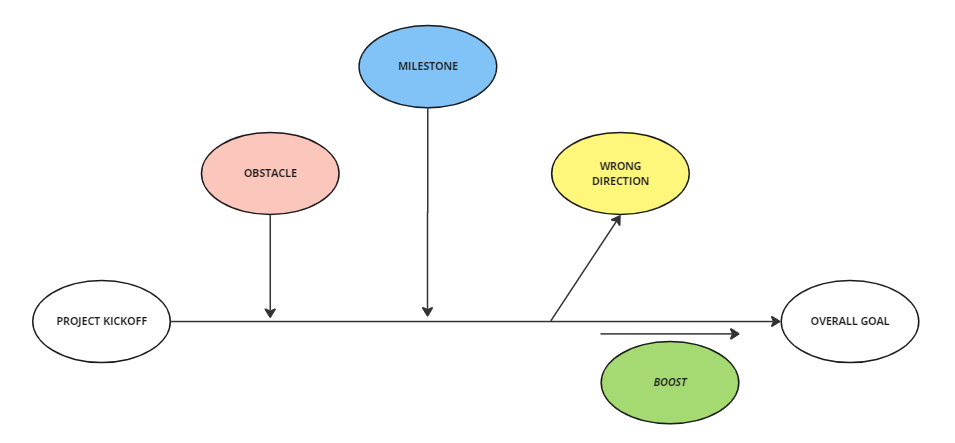
Components
Over the course of the retro we’ll identify:
- MILESTONES, specific achievements or events of note along the journey.
- OBSTACLES, challenges that we had to overcome along the way.
- WRONG DIRECTIONS, things we tried that ultimately didn’t help us achieve the journey.
- BOOSTS, events that helped us complete our task, that pushed us further towards the goal.
Running the Retro
- Start by thinking about where we are now. Ask the team members “have we completed this goal?”. If not, can we plant a flag along the journey (hopefully near the end) that shows how close we are? Build up a consensus of how close the team thinks they are to the goal.
- Next, consider the biggest milestones along the way. These might be mini-objectives or completion of features that are ultimately needed for the whole project which were completed some time ago. Plot these as route markers (notes) along the image. Examples of such events could be team members leaving/joining the project or a specific milestone release.
- Now think about the challenges, hiccups and obstacles that slowed us down. Did these challenges come before the milestones? Did we make any wrong turns along the way? Consider adding bumps and obstacles to your journey to visually show this. Maybe the path forks where the team diverged on an opinion and that led to a different piece of work.
- Next, get the team to label the boosts, the positive influences on the project and the specific times when the team succeeded. Perhaps we found a solution to a difficult data problem, or we got help from a different team that pushed us forwards. These events should be acknowledged and recognised as vital to the success of the project. By finding the smaller successes and victories we can understand how we made it to the goal in the end.
- Now, looking at the overall picture of the project, are there any lessons we can learn from this picture? Are there pitfalls we’d like to try to avoid in future work? Can we recognise where we found solutions to problems on the project and use that to shape solutions in the future?
What should I get out of it?
At the end of the retro you should have a good visual representation of the overall flow and journey of the target project or team goal. This can lead into further discussions about how we shape work and projects in the future.
Graphs
An activity to plot how each member of the team feels about certain measures over time.
Why should I use it?
To get an easy visualisation of how people felt about things like stress, productivity, time spent on meetings or anything else the team wants to measure over time.
- Good for: Understanding our relative shifts in measures over a sprint (or over a period of time), seeing how some small factors can affect productivity or stress.
- Not so Good for: Large teams; this exercise will get very messy once you’ve got 5 or 6 lines on each graph.
Setup
- Draw 4 (or more) sets of axes on the board.
- Label all the x-axes as TIME and label the left and right end of the axes i.e. START OF SPRINT, END OF SPRINT.
- Decide on which measures you want to track for everyone on team, examples can be:
- Productivity
- Time spent on adhoc calls
- Time spent in meetings
- Stress
- Time spent on support work
- Label the Y axes with the above categories.
- OPTIONAL: consider leaving some sets of axes blank and ask the team members to provide suggestions of what to measure.
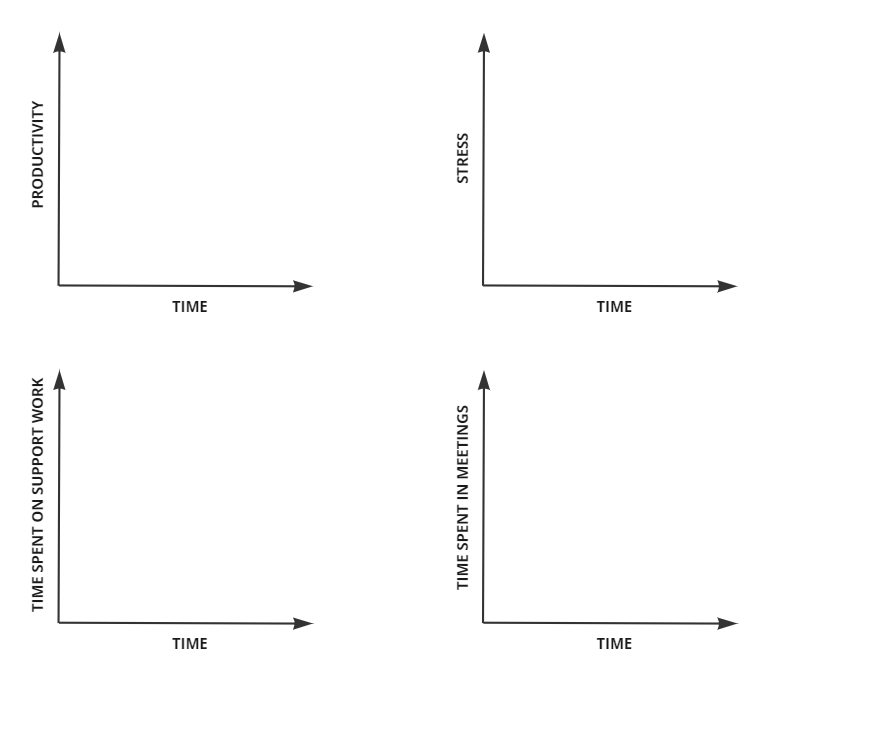
Components
- X-AXIS always represents time, but this should be based on the length of time you want to track. This can be both a good end-of-sprint-activity or a longer period of time.
- Y-AXIS represents different measures but consider these to be relative trackers as opposed to anything quantifiable. For example a low bump in the STRESS graph might signify little thing going wrong but a massive spike up to the top of the graph would show something serious.
- NOTES will be used to mark specific points on the graph that explain its shape. For example, productivity might have a cliff-drop for everyone on team when the environments all fell over.
Running the Retro
- Draw a number of empty graphs on the board, with the x-axis on each graph representing time over the sprint and the y-axis measures you want to discover.
- As the facilitator, let some of the team label graphs as things they want to discuss.
- Each person takes a pen and draws their own personal evaluation of their experience over the sprint.
- After everyone has drawn every graph, identify peaks and troughs, and label these with notes.
- Observe correlations and discuss shared experiences.
What should I get out of it?
You will get a view from the whole team on how certain measures shifted over the specified period of time. This will help you identify common hindrances, and plan accordingly.
Looking Forward Retros
Here we look at the "Looking Forward" retrospectives, designed to consider longer-term goals, aspirations and ambitions for the project and ways of working.
Sailboat
This method involves visualising the project as a sailboat, focusing on the things that will help to push that sailboat forwards as well as thinking about the things that could anchor it to a stop.
Why should I use it?
A simple and clear metaphor that everyone can understand to help break down what they aim to achieve across the project.
- Good for: identifying issues that will likely affect the project and understanding what can help it progress, allowing for long-term planning and goal-setting.
- Not so Good For: teams that prefer less abstract retros. It can be a less personal process, focusing more on technicalities than personal likes and dislikes.
Setup
The facilitator will:
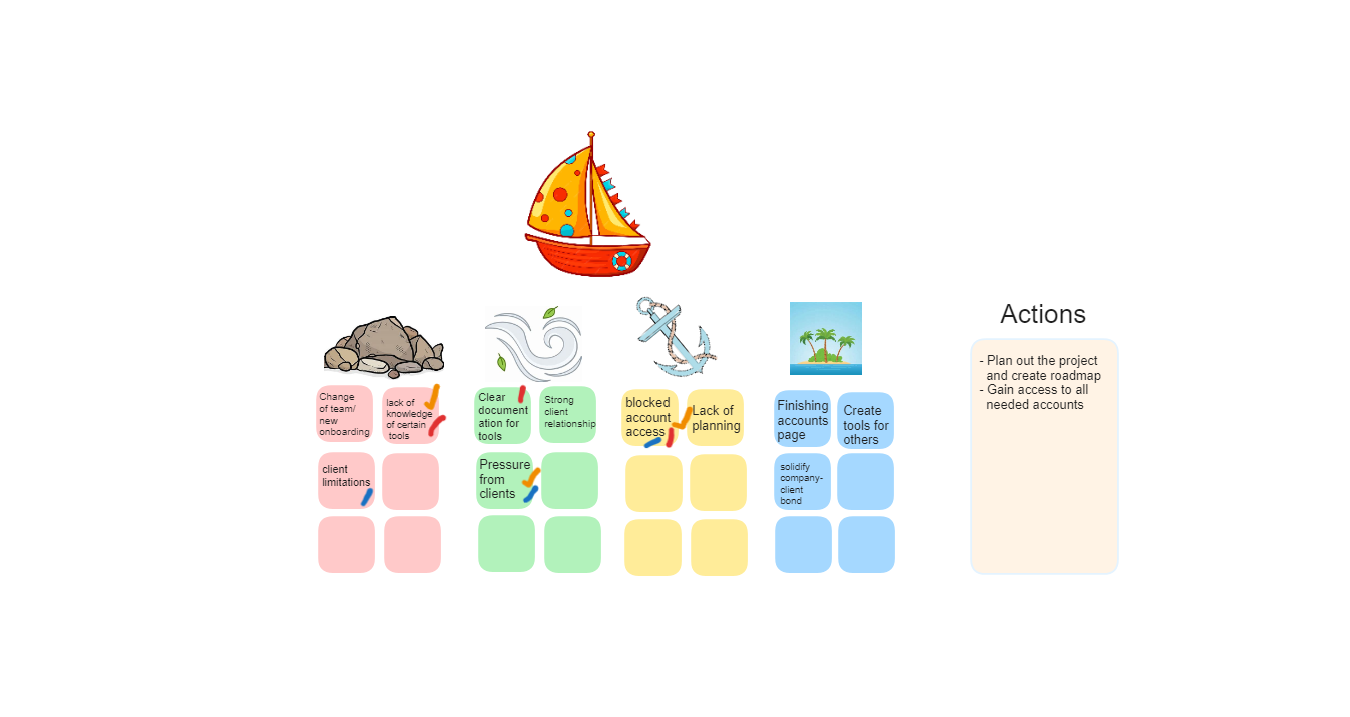
- Insert an image of a sailboat and either below or around it place images to represent the four components.
- Set up sticky notes below the four components that can be used to write the teams ideas on.
- Set aside a section ready to write down improvements for future sprints.
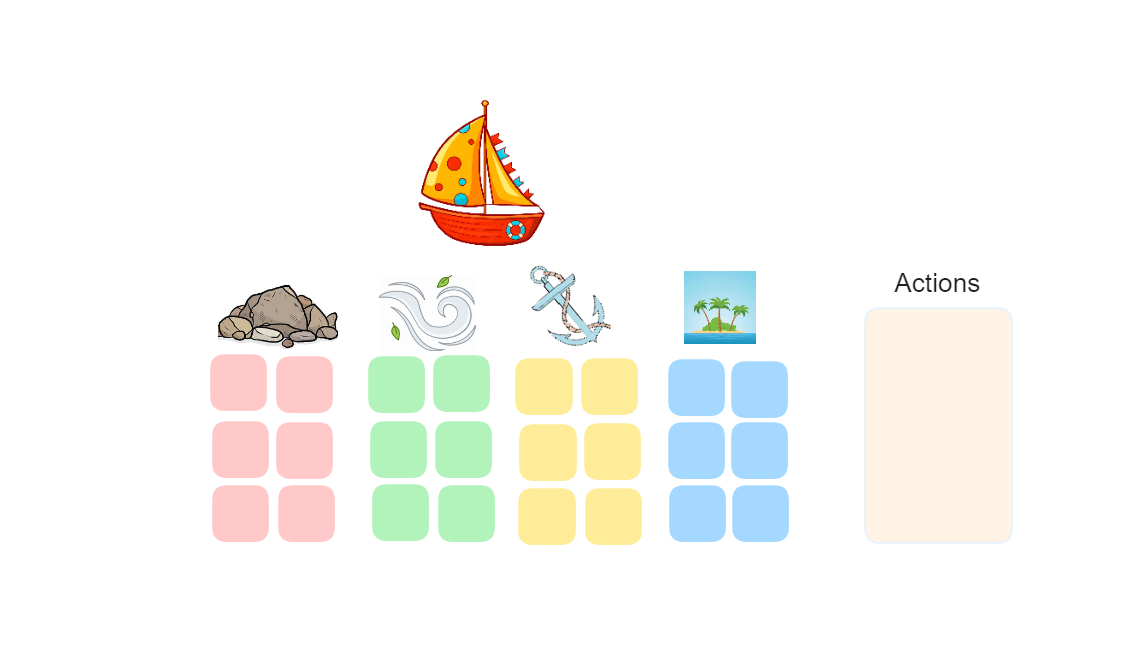
Components
- Rocks represent the risks that can appear across a project. Like rocks hitting the bottom of a boat these can become larger issues in the future if ignored.
- Wind represents the parts that help propel a project forward. These can be the things that give you the motivation to continue, the good things that help you reach your goals (the land).
- Anchors represent all the things that could hold you back. What could stop the boat moving? It's the part to discuss bottlenecks and obstructions that will hinder your progress.
- Land is the goal, the place you want your boat to sail to.
Running the Retro
- Start by agreeing on a time frame with the team to write down ideas, for an hour retro 10-15 minutes should be enough. Make sure to go through the four components so the team understands what they are expected to write about and discuss what you aim to achieve from the session.
- Set a timer and start with the goal. Ask your team what they think the goal of the project is. What do they want to achieve? Allow the team to go through the rest of the components and fill in the sticky notes set out below the images.
- "Walk the board" and read out what's on the sticky notes, going through one component at a time. This is a good time to start grouping the sticky notes by theme, this can be especially helpful if you're working in larger teams where you may not have time to go over every point.
- Ask the team to take 5 minutes to vote on three sticky notes they feel are most important to discuss.
- Spend the rest of the retro going over the tickets with the most votes and use it as a time to discuss what actions can be taken from them. Are there clear risks that you can avoid? Are there any anchors you can remove to help to project progress? You can always ask the person who wrote the note to elaborate and invoke a discussion.
- Make sure somebody makes note from these action so you have them as a reminder for future sprints.
What should I get out of it?
A clear visual of what to expect going forwards in the project. The team should have some ideas over what will help the sailboat to reach the land and where the rocks may be to avoid obstacles in the future.
Kite Retrospective
With this retrospective design, we'll consider the future of the project using the analogy of a kite flying in the wind.
Why should I use it?
This retrospective format is a variation of the "boat" format, and as such has very similar use cases. Facilitating discussion around aspects that will make your kite (project) soar can give your team an idea of the positive areas to focus on, while the tether/tangles can help to identify potential challenges with your project which could hinder progress.
The anchor metaphor provides the main point of difference compared to the "boat" analogy, but is uniquely useful as it highlights firmer constraints which can help your team to formulate realistic and encouraging targets for the future. You may also discover that, on reflection, some of these anchors aren't quite as fixed as you once thought.
- Good For: pre-empting potential challenges, goal-setting within the boundaries of firm constraints.
- Not so Good For: highly technical projects (3 categories might be insufficient).
Setup
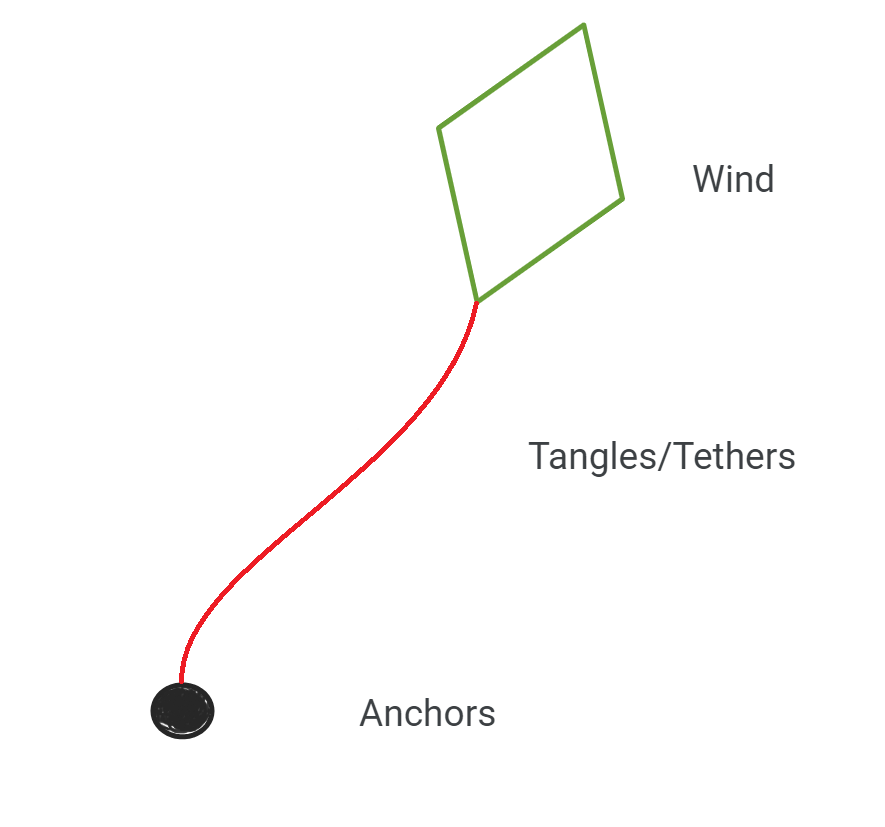
- Draw a kite flying in the sky, with a tether and an anchor, as shown below.
- Label the upper section (next to the kite) as WIND, the middle section (next to the tether) as TANGLES/TETHERS, and the bottom section (next to the anchor or, more commonly, a person) as ANCHORS.
Components
- WIND is for things that your team believes will help push your project in the right direction. These items will elevate your project, contributing positively to your team's enjoyment and your project's progression.
- TANGLES/TETHERS are the things that might keep your project from running smoothly. These could be potential bottlenecks, challenges stemming from your ways of working, etc.
- ANCHORS are the things that you can't change about your project. These could be framed as benefits (such as useful libraries for a coding framework you're committed to) or drawbacks (such as strict external regulations, limiting flexibility). It may be useful to represent the positive and negative anchor items with different coloured notes.
Running the Retro
- Invite your team to add notes to the 3 areas of the kite diagram. Try to keep this section to 10-15 minutes if running the retrospective for an hour.
- "Walk the Board", starting with the ANCHORS, then moving to TANGLES/TETHERS, and finally onto WIND. Read each note, ensuring all team members understand them. Don't discuss the notes in detail yet, and group any related tickets within each category to identify common themes.
- Allocate a number of votes (typically 3-5) to each team member, and encourage them to vote for notes that they find most important. Let your team members know that they can vote for their own tickets, vote for the same ticket multiple times, and see how others are voting.
- Start a discussion on the note(s) with the most votes. This is a good opportunity for the author of that note to elaborate, but make sure all team members are given the chance to contribute. Attempt to gauge the sentiment of the discussion, and guide the discussion towards potential actions/goals related to this note.
- Continue with the next most-voted notes until either your time runs out, or you have a good number of actions to work on (typically 3-5).
What should I get out of it?
The team should have awareness of the potential obstacles and opportunities within the project, as well as some potential limitations. The actions discussed with each note will give an idea of how to mitigate or take advantage of these, respectively. The limitations discussed will provide greater context for goal setting.
Focus Retrospectives
Circles and Soup Retrospective
This retrospective helps teams to identify challenges stemming from factors within or outside their control. This can help team members feel empowered to tackle the causes they can directly control or influence, while also acknowledging that some challenges are simply dropped upon them.
While teams can address the causes of some identified challenges, an exposure to causes which fall outside their direct control can help the team to plan for similar challenges and mitigate their effects. The scope of this retro doesn't have to be limited to one sprint; you could evaluate a much greater period of time, or organise one after your team has overcome a difficult or recurring challenge that is deserving of analysis.
Why should I use it?
- Good For: focussing on specific challenges, empowering your team to work on controllable challenges.
- Not so Good For: complex matters where line between control and influence, or influence and "soup" is poorly defined.
Setup
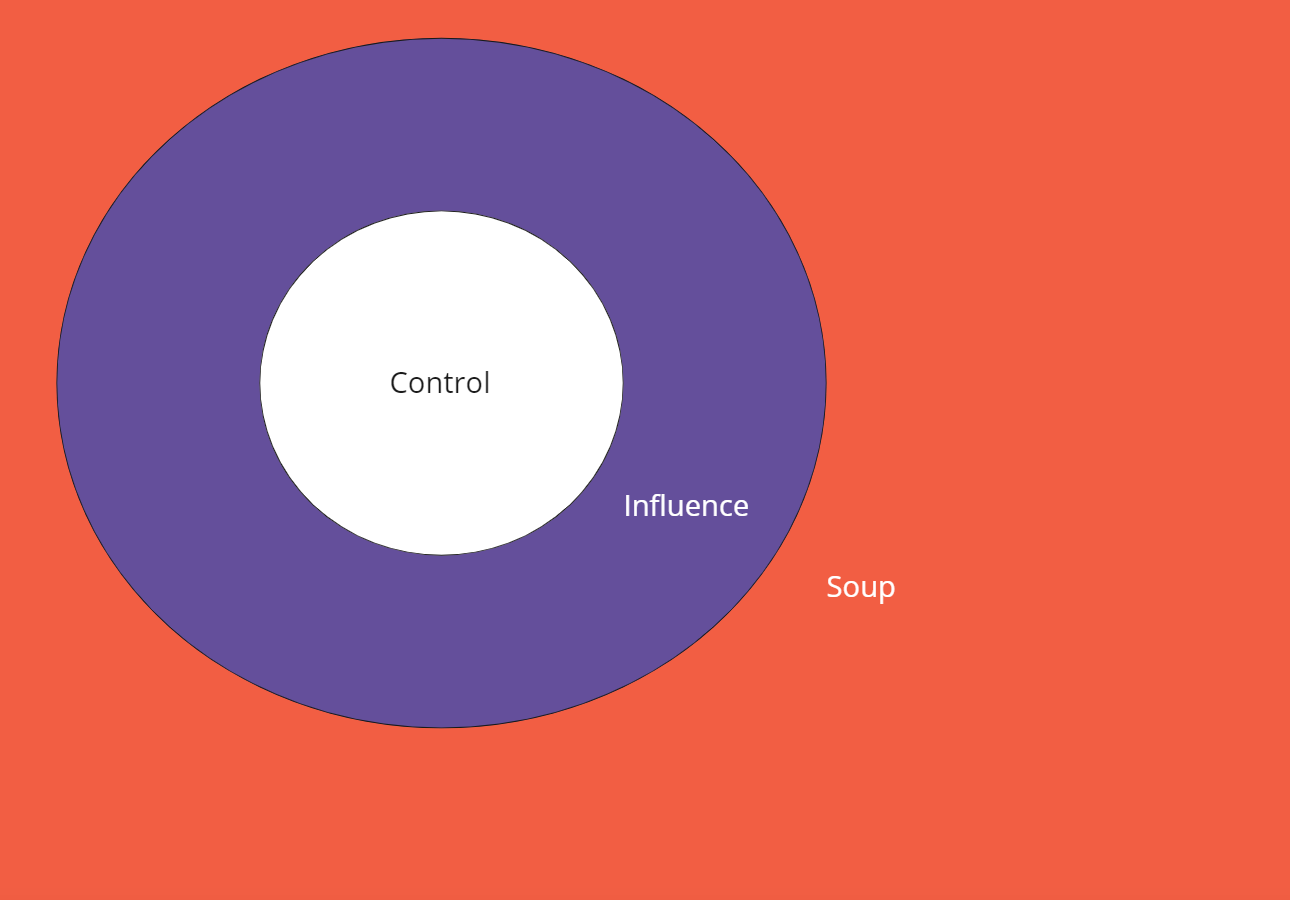
- Draw 2 concentric circles on the board.
- Label the innermost circle as “In Our Control”.
- Label the outermost circle as “We Can Influence”.
- Label the area outside the circle as “The Soup”.
Components
- IN OUR CONTROL is for things that your team or individual team members can control such as processes, team dynamics, and unnecessary team meetings.
- WE CAN INFLUENCE is for things that your team or individual team members can influence (but not directly control). These challenges could be related to another team, such as a design team, or external dependencies such as untimely product changes or additional requirements.
- THE SOUP is for things that your team or individual team members can't directly control or influence. These could be unexpected events such as emergency fixes, or urgent, direct requests from upper management. While these may be outside your control, it's important to remember that your reactions to these events are within your control, and having plan or process to deal with such events can mitigate their effects and avoid some frustration.
Running the Retro
- Allocate 10 minutes to allow all team members to write concise sticky notes identifying challenges they or the team have come across over the period of time being evaluated. Do not place any notes within any categories yet.
- Ask each member to place each of their notes on within the appropriate circle/area.
- Go through the notes on the board, ensuring all team members understand each note.
- Give each team member a number of votes (typically 3-5), and allow the team a few minutes to vote for the challenges they feel need addressing the most. Team members are free to vote on their own notes, and spend multiple votes on the same note.
- As facilitator, group tickets referring to the same challenges/themes.
- Discuss the items the team can control. Discuss actions that the team could take to address them. Asking questions such as "what could we do differently?" or "what's the root cause of this issue?" will help you and your team come up with potential actions to take from the session.
- Discuss the items the team can influence. Discuss potential solutions to these items, such as employing more meaningful and regular communication with external teams, or processes to deal with scope-creep or shifting requirements/designs. Ask if there is a way to change this item from something that we can "influence" to something we can "control".
- Discuss the soup. Do you really have no influence over this challenge? Can we mitigate it or bring it into our circle of influence? For these items, it's wise to discuss how your team can respond to them more effectively, and how much of the burden of these challenges actually resides in the reaction to them.
What should I get out of it?
The team should have a better understanding of the challenges they've been facing. By the end, your team will have focussed actions to help them tackle the challenges they can control or influence, and an acknowledgement of factors which are simply beyond their control.
ESVP
This method focuses not on what happened in the sprint but rather the teams mood and feelings towards the meetings involved.
Why should I use it?
This is a way for a scrum master to understand their team's engagement within meetings.
- Good For: when it's always the same people actively participating in meetings or when the general engagement is low. It is a good method for finding ways to improve it.
- Not so Good For: teams where there is a lack of trust, members of the team may not be truthful with their answers.
Setup
The facilitator will:
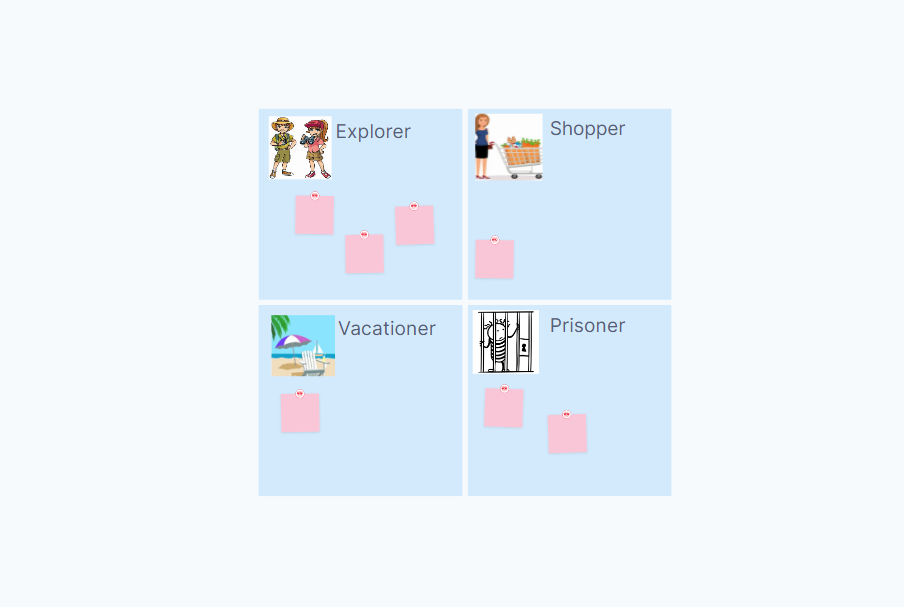
- Insert a grid with four sections, one for each component.
- Add labels or images to represent each component.
- Lay out enough sticky notes for the team to use, one per person.
Components
- Explorers represent those who are really engaged in the project and enjoy learning as much as possible from the meetings. They are always looking to improve and grow within the team.
- Shoppers represent those who are engaged but may learn from the meetings more passively. They generally only take away one thing from a meeting and may have a tendency to take away insights that benefit personal growth rather than the team as a whole.
- Vacationers represent the members of the team that aren't particularly interested in the meetings but enjoy the break from their work.
- Prisoners represent those who don't want to be there but feel as though they have to attend. They may feel like they have more important things to be getting on with.
Running the Retro
- Start by picking a meeting you want to discuss and explain to the team what you want to achieve. Why are you running this retrospective? Make it clear that you are not trying to catch people out or judge them but rather to improve future meetings.
- Run through the four components and what they represent.
- Let the team vote on which category best represents them. You can choose to make these votes anonymous if it helps the team be more honest about their feelings. www.metroretro.io is a good site that allows anonymity.
- Once everyone has voted, this should only take five minutes, analyse the results. If there are a lot of vacationers and prisoners open up a discussion. You may ask if anyone is willing to reveal why they put those options. If they want to remain anonymous you could ask the whole team to think of reasons as to why people may vote for those answers, even if they did not vote for it themselves.
- Start collating some actions. Ask the team what they feel may improve engagement in those meetings. What could you do to make it more interesting? Do meetings need to be shorter? Do you need to mix up who takes the lead on those meetings to help people get invested?
- If there are only one or two team members who chose vacationer/prisoner consider setting up a one to one meeting to see how you can support them going forwards.
What should I get out of it?
A clear idea as to how the team feels about the meetings involved in the project. You should come out with ideas on how you can improve your meetings to keep the team engaged, happy and improve productivity in the long-term.


